ASSESSMENT OF THE LUNGS AND THORAX
These same steps are very popular today in assessment of all systems of the body. These steps are designed to take the nurse through the assessment in a logical and organized sequence. You first start with a very general inspection and history of the patient; then your exam becomes more detailed as you begin to examine the interaction of all body systems.
Visual Inspection - is the first step of the examination. This is a very important part of the exam, since many abnormalities can be detected by merely inspecting the thorax as the patient is breathing.
Palpation - is the first step of the assessment, where we will touch the patient. Many breathing difficulties can be seen during this step. Some systemic problems can be detected during this part of the exam as well as just mechanical breathing problems.
Percussing - is usually helpful only in a limited capacity to the examiner, as we will discuss later.
Ausculation - is the process of listening to the breath sounds with the use of a stethoscope. In this text, we will describe the characteristics of normal and common abnormal breath sounds.
PATIENT HISTORY
Following is a guide to the history-taking process. (Lehrer, 1990). The history is very important to obtain before you begin your examination. The nursing history may repeat some of the same items that the medical history has obtained but the nurse will have different objectives in mind when asking questions and gathering data, The following guide can be used to obtain information from the patient and nursing-related information.
- Reason for Hospitalization (medical diagnosis from chart)
- Family Medical History
- Family history (TB, allergy, asthma, smoking)
- Social history of family
- Occupational history
- Type of work patient is engaged in; are they exposed to air or chemical pollutants
- Exposure to exotic animals, birds; pigeons, parrots, parakeets
- Consider the part of the country they are from; some diseases are endogenous
- General Patient Medical History
- Major medical problems; heart, GI, GU, respiratory surgery, etc.
- Allergy
- Childhood diseases
- Specific Medical History (specific to this hospitalization)
- Pain – pulmonary pain, pleural pain, muscular pain, cardiac pain, describe in detail.
- Cough – type of cough, type and character of sputum, blood in sputum
- Hemoptysis
- Dyspnea – ask circumstances surrounding trouble breathing
- Hoarseness
- Wheezing
THE LUNGS AND THORAX
The lungs are the cone-shaped organs located in the pleural spaces in the right and left sides of the bony thorax. The right lung is divided into three separate and distinct lobes by deep fissures. The left lung has only two lobes. The purpose of the lungs is most importantly the exchange of gases in the body. Air is moved into the lungs through the air passages by the use of the respiratory muscles. In this text, we will not go into detail about these structures, because most nurses are already quite familiar with the respiratory muscles, primary and secondary. If you need a refresher, you may use any basic anatomy test. In this text, we wish to update you on assessment of the lungs and thorax.
Following is an illustration of the thorax and the major landmarks necessary for proper localization of findings. The first consideration is being able to accurately count and localize the ribs. The round and curved rib shown on the very top of the thorax is the first rib. It is at the level of the clavicle. It’s location behind the clavicle and the manubrium, makes it difficult to palate this rib.. The space immediately below this 1st rib is the first intercostal space. If the examiner finds the suprasternal notch (which the manubrium joins the body of the sternum), slide the finger down just a few centimeters, the 2nd rib will be found. The interspace just below this rib is the second intercostals space.
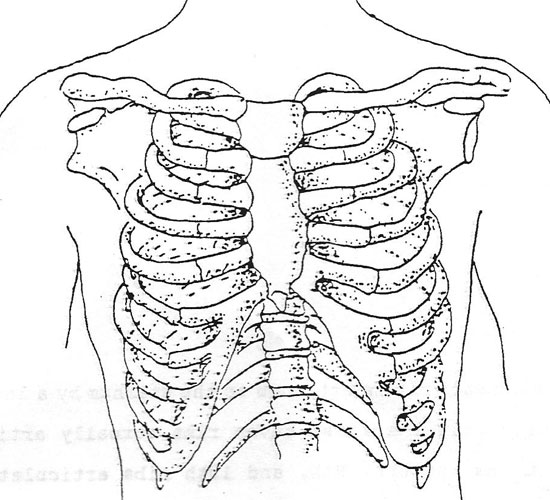
Note also each rib is attached to the sternum by a length of costal cartilage. Only the first seven ribs actually articulate with the sternum, as the 8th, 9th and 10th ribs articulate with the costal cartilage from the rib directly above it,. The “floating-ribs”, the 11th and 12th ribs, have free anterior tips. Please review all above structures named in the text. Count the number of ribs and their location.
Terminology:
- Tidal volume
The volume of air in and out of the lungs with a normal breath, approx. 500 ml)
- Residual Volume
Volume of air which remains in the lungs after a forced expiration (approx. 1200 ml)
- Inspsiratory reserve volume
This term is the extra volume of air which can be inhaled after the person has taken in a normal breath (“forced inspiration”) approx. 3000 ml.
- Expiratory reserve volume
Is the extra amount of air that can be expired by forceful expiration after the person has expired a normal breath of air, (“forced expiration”) approx, 1100 ml of air.
- Inspsiratory capacity
The sum of: tidal volume + inspiratory reserve volume; amount of air you can breathe when you forcefully inspire, after taking a normal breath (tidal volume) (3500 ml).
- Functional residual capacity
Is the sum of: expiratory reserve volume + residual volume. This volume is the amount f air left in lungs after a normal expiration. approx 2300 ml.
- Vital capacity
The sum of: inspiratory reserve volume + tidal volume + expiratory reserve volume. This volume is the maximum amount of air that a person can expel from the lungs after first filling lungs to maximum and then expel air to maximum extent approx. 4600 ml.
- Total lung capacity
Is the sum of the maximum volume to which the lungs can be expanded with the greatest possible inspiratory force. approx. 5800 ml.
EXAMINATION OF THE THORAX
In the clinical setting, examination of the thorax first includes a gross examination of the patient. The patient will be comfortably seated on the edge of the bed, if possible, to best visualize the thorax and breathing patterns. Keeping in mind the structures of the bony thorax, visually inspect the thorax.
Assess the following:
- Respiratory rate and rhythm
- Gross deformities; curvatures, scars, discolorations, etc.
- Abnormal breathing patterns (retractions included)
Keep in mind, if there is any gross breathing difficulty, or any other condition which may compromise the patient; emergency first aid should be administered. We will not try to continue the entire respiratory examination if another emergency condition exists. However, for our “routine” examination, the first step is visual inspection. Perhaps during this part of the exam, the nurse should make a mental note of any abnormality which will need to be further assessed by some other method, such as palpation.
During the time of the visual inspection, the nurse will be aware of any mental status changes in the patient such as restlessness or lethargy or confusion. These changes may be indicative of respiratory difficulty. Vital signs should be taken prior to the examination for a baseline.
Taking all of the above information, the nurse may now continue to the next phase of our examination. Remember to make notes on paper of any abnormal findings as well as the normal findings of the exam. These notes will help you later for charting the findings on the patient’s chart. Accurate information is always important when documenting the patient’s condition.
Observing Respirations:
The normal respiratory rate is 12 – 18 breaths per minute in adults.
DEFORMITIES OF THE THORAX
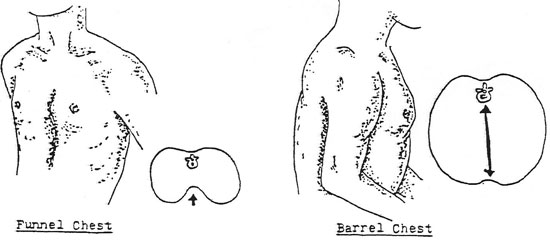
There are many possible deformities of the thorax. The illustration shows two common deformities Funnel Chest and Barrel Chest. While performing your examination you may be unsure as to the proper term or name of the particular deformity. If you are unsure about the correct term, just describe the problem in detail and describe the subjective and/or objective symptoms that may be present.
Funnel Chest may be described as a deformity where the sternum is depressed and results in pressure placed upon the underlying organs. This may cause a change in the blood pressure or pulse; chart these changes if present.
Barrel Chest may be described as a deformity which causes a rounded chest where ribs are elevated and separated more than normal. The slope of the ribs is also changed, they are almost completely horizontal.
PALPATION:
Expose the patient’s thorax providing for as much comfort and privacy as possible. Use the fingertips and flat of the hand in order to palpate the thorax. Use firm but gentle pressure to assess the breathing and movements of the thorax. Next, palpate any abnormalities which you noticed from the first step of this assessment the inspection phase.
Palpate the following:
- Size and shape of the thorax during respirations
- Intercostal spaces (for bulging or retractions)
- Any scars or other skin abnormalities (skin temperature as well)
- Tenderness or pain (palpate gently)
Palpation should be done in an orderly method. First start at either the top or bottom and palpate through the entire thorax surface. Next observe and palpate the posterior thorax. Use the same methodical approach. As with the previous findings, take notes and carefully chart any abnormal findings.
Locations:
Describe the location of your abnormal findings according to the way your hospital requires. A general method of describing location is to use landmarks such as nipples, nipple line, the midsternal line, etc. Indicate anterior or posterior thorax, and use the midaxillary line location when applicable.
When charting your findings, especially abnormal ones, be very descriptive as to specific types of abnormality. If the breathing is abnormal, describe the rate and rhythm. If there is an abnormal node or mass, describe its location and size and whether tender or non-tender. These locations will apply to the posterior thorax as well as to the anterior.
Additional landmarks:
- Midsternal line
A line extending downward from the sterna notch.
- Midclavicular line
A vertical line parallel to the midsternal line and extending downward from the midpoint of each clavicle.
- Anterior Axillary Line
A line extending downward from the anterior axillary fold.
- Posterior Axillary Line
A line parallel to the anterior axillary line beginning at the posterior axillary fold.
- Midaxillary Line
A vertical line starting at a point midway between the anterior and posterior axillary lines.
- Midspinal Line
A vertical line in the center of the back running along the spinal process.
- Midscapular Lines
Vertical lines on the back, parallel to the midspinal line, extending through the apices of the scapulae.
- Infrascapular Area
Area of the posterior thorax lying below the scapulae
- Interscapular Area
Area of the posterior thorax lying between the scapulae.
PERCUSSION
Percussion is of limited use to most nurses. The technique can reveal abnormalities which might be better assessed by palpation of auscultation. Use percussion in conjunction with these other methods of assessment in order to confirm suspicions of underlying pathology.
The technique of percussion, striking the chest wall, sets up sound waves. These waves set the underlying tissues in motion, producing audible and palpable vibrations. Using this method is effective for only a depth of about 5 to 7 cm. into the chest wall tissues. Therefore, deeper problems are virtually undetectable by this method. Percussion will be help to indicate the presence of air or fluids in underlying tissues.
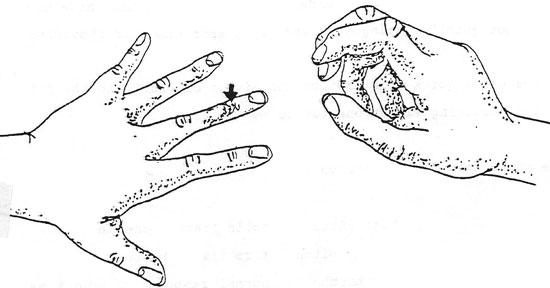
As shown in the illustration:
- Hyperextend the fingers as shown, pressing the middle distal phalanx firmly on the surface of the chest wall. (Do not let the hand rest upon the area as it will decrease the sounds heard).
- Hold the opposite hand close to the hand on the patient. Flex the middle finger as shown, retract and strike the area shown by the arrow. Use a quick motion of the wrist.
- After striking at a right angle, quickly withdraw the finger (the striking finger), so as not to dampen the sounds.
- Strike an area twice, in order to get a clear sound. Move on to next spot quickly, using a uniform blow each time for comparison.
Always use a quick wrist motion and listen carefully to the pitch of the resulting vibrations set up by the blow.
Use this chart for comparison:
- FLAT High pitch solid tissue beneath
- DULL Medium pitch firm tissue beneath
- RESONANT Low pitch normal resounding lung tissue
(semi-hollow or “fluffy” sound)
- HYPERRESONANT very low pitch very hollow sound, (emphysema)
- TYMPANY musical very hollow sound (air bubble)
Percuss across the tops of both shoulders (apex of each lung). Next, move down and move across the thorax, striking each spot as you proceed and noting the sounds produced. Normal healthy lung tissue should resound with a resonant and full sound; as there is normal “fluffy” lung tissue beneath. If there is a hemothorax or pneumonia with fluid present, the sound will be flatter or duller as described in chart above. Remember to percuss anterior and posterior thorax if you decide to use this technique.
AUSCULTATION
This technique has many indications and is widely used today. It will indicate that there is normal air flow through the trachea and the bronchi, and into the lungs. It can indicate the presence of fluid and/or other obstruction in the air passages. Also the condition of the surrounding tissues can be assessed by this method.
Just as with the other methods of assessment, have the patient sit comfortably and have them breath just slightly deeper than normal through an open mouth,. Listen at each spot (described in the following paragraphs) for at least one full breath. Compare the symmetry of the sounds (each side of the thorax). If the patient becomes faint (from hyperventilation during the exam), stop temporarily, and then proceed.
You will be listening for:
- Quality and intensity are they full and easily audible, rate, rhythm, are they diminished?
- Adventitious sounds abnormal breath sounds; these sounds are distinguished from the variations of normal breath sounds which can occur due to hypoventilation or hyperventilation.
SOUND:
Before we discuss auscultation of breath sounds, we will discuss some of the characteristics of sound. Sound has three basic characteristics; intensity frequency, and duration.
Frequency refers to the number of vibrations per unit of time; and it is measured in cycles per second, or Hz (Hertz). What is called a high frequency sound will have a large number of vibrations per second. Wheezes can be of high frequency or low frequency, or can be described as high-pitched or low-pitched. The “quality” of sound is also known as its “timbre.” It is a result of the component frequencies that will make up a particular sound. The quality of a sound will allow us to recognize if a musical note was played on a guitar or a violin or a piano. You may play the exact same note on all instruments, but that note will have a different quality on each instrument. This quality is important when listening to breath sounds and in noting changes in the spoken voice through the stethoscope.
The intensity is described simply as the loudness of the sound. Intensity is affected by these factors:
- Amplitude
- Energy source
- Distance the sound travels
- Medium through which the sound travels
The above factors will determine if the sound is loud or faint or distant. For example, if you are listening to lung sounds through lung tissue that is full of fluid, the sound will be louder because fluid conducts sound better. Sound travels better through material that is denser. Our ears usually hear sounds using normal air conduction of sounds. In a vacuum, no sound is transmitted. Duration of vibrations of sound will determine if our ears interpret sounds as short or long sounds. For example, a patient can have short or long wheezes. The average adult can hear vibrations with frequencies from 16 to 16,000 Hz. Our maximum sensitivity is between 1,000 and 2,000 Hz. Below 1,000 Hz our sensitivity falls off rapidly. Most breath sounds are below 500 Hz, therefore we must listen carefully to all breath sounds, as our ears are not very sensitive to these frequencies.
NORMAL AND ABNORMAL BREATH SOUNDS
Normally, it is difficult to hear breath sounds. Normal breath sounds will seem faint or distant when auscultating. This is a normal feature of breath sounds. Many authorities have described abnormal breath sounds using varied terminology. The Joint Committee on Pulmonary Nomenclature of the American College of Chest Physicians-American Thoracic Society renamed abnormal breath sounds into two main categories in 1975. These two categories are:
- Rales: for a discontinuous sound (crackle)
- Rhonchus: for a continuous sound (wheezes)
In 1980, they further categorized the sounds as:
- Crackles (course and fine) 2. Wheeze 3. Rhonchus
Cugell, in 1978, and Hudson, et al., in 1976 coined terms such as dry rales, sticky rales, bubbling rales, and others. Still other authorities use further derivations of these terms. Each nurse must follow their own hospital policy when they attempt to describe breath sounds.
In this text, we use the definitions below for breath sounds:
| Normal | VESICUCLAR | low pitch | heard over most of normal lung |
| Normal | BRONCRO-VESICULAR | medium pitch | heard over mainstream bronchi |
| Normal | BRONCHIAL-(TRACHEAL) | high pitch | normally heard over trachea |
| SOUNDS tubular (like wind tunnel) | ||
| ABNORMAL | RALES | discrete non-continuous sound, produced by moisture in the lung tissues; can be fine in quality or coarse. |
| ABNORMAL | RHONCRI | continuous sounds produced by air being forced through narrowed passages, narrowed by secretions and/or constriction of the air passage. |
| ABNORMAL | WHEEZES | continuous musical sounds produced as air is forced through narrowed passages, like rhonchi, can occur in inspiration or expiration; with rales, may change character after coughing |
| ABNORMAL | STRIDOR | loud musical sound of constant pitch, most prominent during inspiration can be heard very well at a distance due to its loud intensity; sound is produced by obstruction of the airway, laryngeal tumors, tracheal stenosis or aspirated foreign body. |
| ABNORMAL | PLEURAL FRICTION RUB | non-musical sound, usually longer and lower pitch than lung crackles, sounds like the creaking of old leather; etiology; coarsened surface of the normal pleura, due to fibrin deposits, thickened or inflamed or with neoplastic cells. |
| ABNORMAL | MEDIASTINAL CRUNCH | (Harman’s Sign) This is a coarse, crackling sound or vibration that is synchronous with systole and is frequently heard over
the precordium in the presence of mediastinal emphysema. This
distinctive popping or crunching sound is thought to originate from air |
| ABNORMAL | BRONCHIAL LEAK SQUEAK | This is heard in patients with bronchopleurocutaneous fistula; a high-pitched squeak over the affected chest area during sustained Valsalva maneuver, the pitch being higher in smaller fistules than in larger ones. |
| ABNORMAL | INSPIRATORY SQUAWK | A musical sound, squawk found in some patients with diffuse pulmonary fibrosis; this squawk is usually accompanied by rales (crackles) and also predisposed by hypersensitivity pneumonitis caused by inhaling antigens. |
Other abnormal sounds will also be presented in this course. They are sounds which can be helpful in diagnosing certain conditions of the lungs (diagnosis here refers to assessing possible abnormal conditions of the lungs….nursing diagnosis). Always place the diaphragm of the stethoscope firmly over the area of the thorax and move it from right to left in order to assess symmetry of the sounds your will hear.(refer to the diagram).
Terms relating to the formation of breath sounds:
- Turbulence
Sound that is caused by the uneven flow of air in the human airway; turbulence is thought to be the source for all normal breath sounds.
- Laminar Flow
Air flow in a straight, smooth pipe; if it flows unobstructed, the pressure will gradually decrease and no sound will be created, because there is no turbulence.
- Turbulent Flow
Sound is created by this type of air flow. In the airway, the laminar air flow is broken, and currents form. Currents cause uneven air flow and produce sounds.
- Vortices
This is a whirlpool of air that is started when air enters a wider channel from a narrow one. Vortices are created in the airway and will help to form some of the lung sounds heard when air is also turbulent.
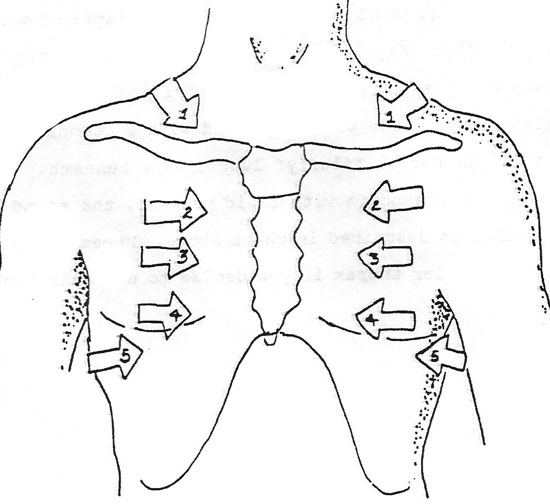
When auscultating or performing each part of the assessment on the lungs, follow a similar pattern as shown in the below diagram. You should proceed in an orderly manner, from top to bottom.
Begin at the apex of the lung; go right to left side. Next, place the stethoscope on the chest wall, going from side to side, in the same spot on each side. Proceed down the length of the chest wall and using several different spots in the lung field.
Remember to be symmetrical, *compare on side, same spot, to other side of chest, same spot. Perform same for posterior thorax.
Right lung: 3 lobes a. RUL right upper lobe
b. RML right middle lobe
c. RLL right lower lobe
Left lung: 2 lobes a. LUL left upper lobe
b. LLL left lower lobe
When performing any of the preceding assessments, be sure to assess all lobes of the lungs. Note that anterior only, a small part of the left lower lobe is able to be assessed. The same holds true for the right lower lobe.
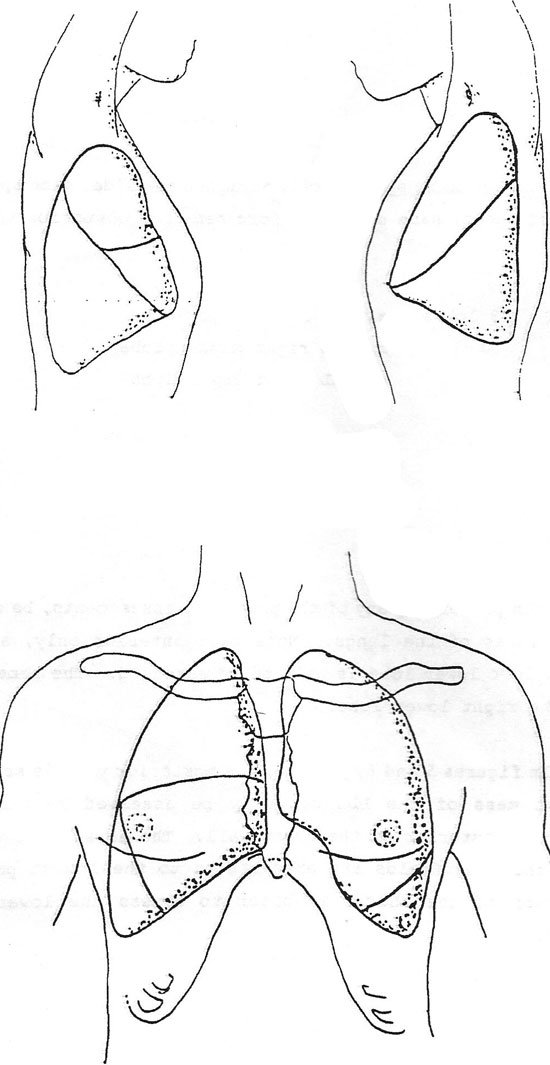
In the figure, the posterior view is seen, and the largest mass of the LLL can only be assessed by carefully examining the posterior of the chest wall. The nurse must then be sure that the lung fields are auscultated to the lowest point on the posterior of the thorax in order to assess the lower lobes completely.
Many disorders such as pneumonia will virtually go undetected if the examiner does not carefully look at and assess the lower posterior borders of the lungs. Also, patients who will lie for long times on their backs may develop fluid collecting in these lobes; another reason for the careful assessment of these lower lobes.

This figure shows a lateral view of the lower lobes; pointing out how the bulk of the mass of the lower lobes is toward the posterior of the thorax.